Showing posts with label DIY. Show all posts

Playhouse Update

8.17.2016

The exterior of the playhouse is moving right along! The cedar shingles and windows have been installed, and Kev's dad created some really amazing detail pieces for the peaks:


Next up: trim, window hinges, doors, and more paint. I feel like I need to get a paint sprayer for the inside though - it's going to be intense. All. That. Wood.

The funniest part of this is that girls are so over the whole finishing phase of the playhouse - they're already playing in it! I can't wait to fancy up the inside for them a bit though. We're loving the privacy it is already giving us, and we can't wait to plant our little vegetable garden behind it next year. Yay for fun new backyard getaways! xo, Lauren

A Playhouse Update

7.28.2016
The playhouse is moving right along, thanks to the hard work of Kev and his dad. I can't even express my admiration for how they have worked from morning til evening day after day in the hot grueling sun. The middle of July is probably not the best time of year to be roofing. But they pushed on, and it is really starting to take shape. I'll tell you what, these are two very lucky little girls. When I asked Kevin to build a playhouse for them I imagined something much smaller and simpler. But he was smart and thought long-term. Not only will this have longevity for the girls as they grow, but when they officially grow "out" of using this space, we'll be using it as our garden shed (unless of course I take it over as my she-shed? Just kidding honey!) We'll be planting our vegetable garden at the back of the shed next summer, and I can't wait to be able to walk out the door and pick the produce that I need from our back yard. I really miss having a constant steady supply of juicy tomatoes at my fingertips.


At some points during the day Kev could barely even touch the roofing materials, it was so hot. They eventually got smart and worked on it in the evenings, but then after a while his dad would end up having to point a flashlight at the roof so Kevin could see!

We also got *almost* a coat of paint on the outside, and WHAT a difference. We're putting cedar shingles on sides of the peaks (they just came in today - hurray!), and I think we're going to leave those natural. The windows are going on, which I painstakingly painted. Normally I say you can never have too many windows, but not when you have to paint them all!


Still to come, the front will be getting a pergola, which I think we're going to leave natural, and there will be a Dutch door on the front, barn door on the back, and window boxes will all add pops of color. And then! And then. I get to decorate. I am SO excited. I've been collecting odds and ends from Craigslist and consignment shops with the girls and we have found some really fun stuff. Stay tuned, I think we're in the home stretch! xo, Lauren

How to Make Your Own DIY Water Table

6.23.2014


I've been wanting to make a water table for the girls for a while now - they both love the water, but whenever I get out the kiddie pool I have to watch Lucy like a hawk. She's definitely full-on toddler right now, and toddle she does. She loves to stand up in the pool and climb in and out and I'm paranoid that she's going to fall and crack open her head or slip under the water. A water table seemed like the perfect solution for those hot days when splashing around is definitely needed, but I need to get a few things done, like watering the flowers or getting a project done outside. When I looked around online at the options for water tables, I couldn't find anything I really liked for the price - we're on a budget this summer, and, to be honest I'm not a huge fan of the plastic monstrosities. So when Glidden® paint asked me to partner with them on a project, I knew just what I wanted to do.


To keep the project as budget-friendly as possible, I headed over to the thrift store to see what I could find. After a bit of searching, I came across this end table that needed a little bit of love for $4.99, and the best part is, it was half-price day so I snagged it for a mere $2.50.

After I got it home I looked around the house to see if we had anything that I could use as a pan for the water. I found a couple of plastic options, but when I saw this white metal tray I thought it would look really nice and crossed my fingers that it was water-tight. Luckily it was and was a perfect fit for the end table. Now I'm not super-experienced when it comes to power tools, and Kev was busy with work for his grad class, so I called up my dad to help me out with inserting the tray into the table. Here's how we did it:

1. To center the tray, we measured in from the edges of the table.
2. After it was centered we traced around the tray's perimeter with a pencil.
3. Next we measured the width of the lip of the tray and measured in from the initial tracing we made.
4. To start our cut we drilled holes in the corners with a spade bit.
5. Next, we used a saber saw to cut along the lines that we measured.
6. After we had the entire rectangle cut out we inserted the tray into the opening. Luckily it was a perfect fit - thanks Dad! :)

Next I started in on an area where I'm much more comfortable - painting. First up: choosing a color for the project. One thing I really love about Glidden paint is that they don't have a billion different colors to sort through. Instead they have a simplified palette which makes it a lot less overwhelming to choose a color. I knew that I wanted a bright yellow, so I grabbed three of their most vibrant yellows - Glidden paint Dazzling DaffodilGlidden paint Spicy Banana Pepper, and Glidden paint Extra Virgin Olive Oil. I loved that the Spicy Banana Pepper and Extra Virgin Olive Oil swatches weren't quite a true yellow - they were a little more muddied and had more personality than the Dazzling Daffodil. I ended up choosing Extra Virgin Olive Oil because it was just a bit richer than the Spicy Banana Pepper. (And is it just me or is anyone else hungry now?)


I had an image saved of a dresser that had been painted with a chevron pattern on the front, and wanted to use that as inspiration. I thought it would help to freshen up the look of the very traditional end table and I liked the idea of bringing in a second color. I ended up using Glidden paint's White on White - nice and crisp and simple. I purchased both in exterior semi-gloss so that it would hold up to water and life outside on the patio.

After I selected my colors, here's how I went about applying the paint:


1. First Kevin sanded the entire piece for me with an orbital sander and got the details by hand.
2. I painted the face of the end table in White on White - two coats did the trick.
3. The rest of the piece was painted with the Extra Virgin Olive Oil - I absolutely love how the color turned out - it's exactly what I was picturing.
4. After the paint had time to dry, I used painter's tape to tape out my pattern. First I measured to find the halfway point of the white section and stretched a piece of tape horizontally across the white section of the table.
5. Next I measured 1.5 inch sections and placed the tape at an angle across the top section of the white part of the table.
6. Before applying the Extra Virgin Olive Oil paint I went over the edges of the tape in the White on White. That way if any paint bled under the tape it would be in the white rather than the yellow.
7. After the white had dried and sealed any places that could have bled, I applied the Extra Virgin Olive Oil.
8. I like to remove the tape while the paint is still a little tacky - I've had better results than if I wait until it's completely dry and cured. After everything in the top section was dry I repeated the same steps in the bottom section, but had the stripes slant in the opposite direction. This time the stripes that I painted yellow would be below the white stripes above.

After everything had a long time to dry and cure, I popped in the tray, filled it up with water, and threw in a bunch of our bath and pool toys. I absolutely love how it turned out and the girls are having a blast with it. Surprisingly Violet seems to like it even more than Lucy and keeps asking if she can keep it forever, because she, "Loves it soooo much!"


When the weather gets cooler we could fill the tray with sand, corn, or even dirt for the girls to dig around in, and after they've outgrown the table we could even fill it with dirt and use it as a planter for succulents. I'm hoping we'll be able to enjoy it in one form or another for a long time to come!

Disclosure: This post was sponsored by Glidden paint through their partnership with POPSUGAR Select. While I was compensated to write a post about Glidden paint, all opinions are my own.

DIY Easter Bunny Surprise Balls

4.07.2014
I found the cutest Easter bunny surprise balls last year online, and really wanted to buy them for Violet's Easter basket this year. Unfortunately, they were no longer for sale :/ So I decided they looked easy enough - why not make my own? And I think he turned out pretty cute!

Here's how I did it:

1. Fill an Easter egg with goodies of your choice (these are a couple of Violet's favorite flower hair ties from Lorie Marie's Pretty Little Things shop):


2. Take some streamers and start wrapping them around the egg (if you want a more "perfect" ball shape, cut your streamers in half or thirds so that the width is thinner. I kept mine the standard size so that it would be easier to unwrap for Violet):


3. Keep wrapping until you get a ball shape, then tape the end and kind of shape the ball gently with your hands:


4. Cut a circle and two bunny ear shapes out of card stock. Use markers to fill in the ears and draw a nose and mouth onto the circle. Bend the bottom of each ear back and glue everything onto the surprise ball. Draw the eyes directly onto the streamers:


Voila! Violet saw me making it, so I'm not sure what she'll think about something Mom made being in her Easter basket (you know, because the Easter bunny is supposed to bring that kind of stuff), but maybe she won't give it a second thought? I guess we'll have to wait and see! xo, Lauren

P.S. 8 of the Cutest, Cuddliest Easter Bunnies + 25 Sweet (but Sugar-Free) Gifts for Kids

Christmas Forest Advent Calendar - Free Printable

11.11.2013

We are trying to keep things fun and cheap here at the H-Haus this holiday season, so I decided to make our own advent calendar in lieu of buying a lot of decorations. It'll be a great display on a TV stand, console, or mantel and a fun activity for Violet (and someday for Lucy too!) I actually got the idea from some old paper party hats we had, but they weren't the right colors, so I decided to trace them and make my own version. Then we printed them out, decorated the "trees", and folded and taped everything together and voila! Cheap (and inexpensive) Christmas fun!

I've included the files for you all as a free printable as well, just download, print, decorate, and assemble - it's pretty self-explanatory but if you have any q's I'm happy to help! We used dot stickers (left over from our raid-your-craft-stash gift wrap last year) and a gold paint pen to decorate our trees, but you could leave them plain too and they'd look just as pretty. To put them together I used packing tape because it's a lot stronger than regular tape and easier to work with than glue. I printed some on a thick textured paper which looked really pretty - almost like watercolor, but I ran out and printed the rest on regular printer paper and that worked just fine as well. You can hide little gifts under each cone and in the packages, then lift up the cone on the appropriate day - easy peasy :) Downloads available after the jump!

Creating a Costume - The Hoodie Modification

10.14.2013

Another inexpensive and easy way to create a costume for your little one is to modify a basic hoodie. My love for this method is not new - I first discovered it via this Etsy shop a few years ago. It's cheap, easy, and the best part is it's WARM for those of you who live in a place where October 31st = cold.

There are like a billion Etsy shops where you can buy these (just search "hoodie costume"), but they're pretty easy to make on your own with a little felt/fabric and a hot glue gun. Here are some fun examples and tutorials to spark your imagination:
I could go on and on - the possibilities are seriously endless!

Image Source: Mokkasin

Even More DIY Halloween Costume Ideas for Kids

9.20.2013
There are some really cute store-bought costumes out there these days, but I personally still prefer DIY costumes. My mom always made our costumes when we were kids and there's just something about having a one-of-a-kind, cobbled together, creative get up that really gets me. Here are some favorite DIY Halloween costumes for kids and babies that I've come across this year:


Click through for more DIY Halloween costume ideas after the break!

Lovely Little Shop

9.18.2013

Aren't these DIY embroidery kit plushies just the most adorable thing you've ever seen?! I don't know that mine would turn out so well, but I'm willing to give it a go. You can find these lovelies and more over at Kiriki on Etsy. xo, Lauren

P.S. Don't forget to enter to win $100 at Minted.com!

Play Kitchen Before & After

8.23.2013
A long-time reader, Andrea, recently emailed me these stunning photos of her daughter's play kitchen, and I just had to share it with you all. Here it is before:

 And after:


Crazy good, am I right? She used my knob DIY too - love it! Thanks so much for sharing with us Andrea! You can see more photos over on her blog, Andrea Jennison Interiors.

Happy Friday! xo, Lauren

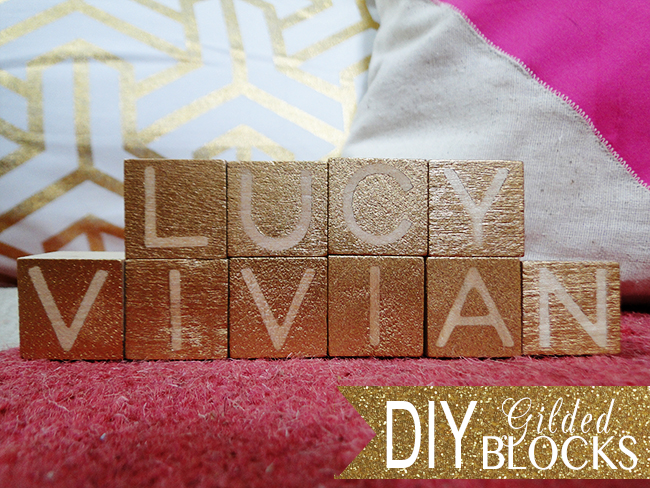
DIY "Gilded" Blocks

6.03.2013
I've been coveting these gilded alphabet blocks from Cabin 7, but at $260 for a set, they were a bit out of my league. So I decided to roll up my sleeves and go for the poor man's version with a little tape and a can of metallic spray paint:

You will need: plain wooden blocks, metallic spray paint, letter stickers, painters tape


1. Affix the letter of your choice onto one of the blocks. I chose "puffy" letters so that they'd be easier to peel off:

2. Cover the remaining sides with painter's tape:

3. Place your blocks letter side up on a piece of cardboard (outdoors or in a spray booth) and spray with metallic spray paint using light, sweeping motions. Peel off the letters and tape and, voila! Certainly not nearly as fancy as the original, but they'll do! xo, Lauren 


(P.S. These are meant for display purposes - not for use as a toy. They'd probably be fine for older kids, but not little ones who would put them in their mouth/chew on them, etc.)

A Camping Party

5.29.2013

Decorate with these floral pennants, "yay" flags, and this blanket as a tablecloth or guest seating

Make these s'mores in a basket

Top of your cake with this free printable camp cake topper

Have guests take home these paper bag + fabric favors

Something To: Meg of Oh Bother

5.09.2013

Our last Something to post is from my friend Meg, who I've known since high school! She just started blogging and I love what she's done so far. Her blog is called Oh bother and she writes about her sweet daughter Holden, life as a working (sort of single) mom (her husband works out of state five days of the week), and my favorite part - her hilarious Pinterest fails :) Without further ado, here are Meg's picks for today:


make: DIY stuffed dino
wear: upcycled little girl's dress (made from a men's dress shirt!)
live: Every Little Thing sign by Susie Harris
read: Where the Sidewalk Ends by Shel Silverstein
play: garden veggies

Something to from Katie Stratton

5.03.2013

Today I have a lovely Something to post for you all, created by Katie Stratton of Katie's Pencil Box. Her blog is filled with the most gorgeous imagery, and I have to say I am just simply dying to see her daughter Phoebe's finished nursery. Thanks so much Katie for sharing your picks with us! xo, Lauren

make: diy mountain pillow
wear: ochre dress
live: spotted pouf
read: A Long Piece of String
play: toy banjo

Something to from Esther Garfield

5.02.2013

Today's Something to post is brought to you buy the lovely Esther Garfield of Buy Modern Baby. Esther is mama to two adorable little boys, so I was super surprised when I saw her adorable girly pink picks for us today! Take it away Esther:

I'm so excited that Violet is going to have a baby sister to play with!  Inspired by lovely little girls and the upcoming spring, I've got something to...


make: diy lockers
wear: neon pink star dress / fringe suede mocassins  
live: hot pink side chair
read: Spring is Here
play: fade out nesting dolls

Something To from Jess Craig

5.01.2013


I'm happy to welcome the lovely Jess Craig of irocksowhat for today's guest post! Jess is a super-inspirational mama who tells it like it is. I think that sometimes blogs can be a little too sugarcoated, but Jess just feels, well, real. She's open and candid about motherhood, her weight loss journey, and how she manages to look completely gorgeous day in and day out - I mean, those eyebrows! But I digress. Here are Jess's fun and fresh picks, thanks so much for sharing them with us! xo, Lauren


make: lit campfire
wear: small skivvies
live: golden toadstool lamp
read: The Down and Dirty Guide to Camping with Kids
play: bearded folk man dolls

Something To from Bron Bates

4.30.2013

Our post today comes from the lovely Bron Bates of Baby Space. Bron lives in the land down under with her fifteen-year-old, five-year-old, and sweet baby girl. She was one of my maternity style inspirations and is currently rocking one of Sakura Bloom's slings for the Sling Diaries. I hope I look half as gorgeous when Violet is fifteen! Thanks so much to Bron for sharing your lovely picks with us today. xo, Lauren

make: papier mache unicorn bust
wear: poplin halter suit
live: Utzon crimson wave willow chair
read: Olivia and the Missing Toy
play: Omm nesting dolls
 

© A Lovely Lark All rights reserved . Layout by Blog Milk Powered by Blogger

Pin It button on image hover