I can't wait til I can read chapter books to Violet. I've never read the original Wizard of Oz series (although I have read the Wicked series), but now I fully intend to.
Next week is guest blogger week I'll be attending a workshop with Joy Cho of Oh Joy! and working on opening my Etsy shop. Stay tuned for amazing posts from lovely people. Happy Friday!
Hope you all had a great week - happy Friday! Today I want to write to you about a product that is very near and dear to my heart. It has literally been LIFE-CHANGING for us here at the H-Haus and you simply must know about it. I was recently contacted by Munchkin Safety Gates to try out and review one of their new line of baby gates. The timing couldn't have been better as the Hubster and I had been arguing discussing the possibility of installing a baby gate on the stairs for weeks.
You see, our daughter is addicted to stair climbing. Obsessed, in fact. And it's been pretty scary as our stairs are very steep and narrow AND have a angle/curve for the first three stairs before going straight up. Although we have a pressure-mounted gate in the kitchen, but I wasn't at all impressed with it. It was a hand-me-down so I'm not complaining, but I just didn't trust the thing to hold up on the stairs when my kid tried to push it/pull it/climb it/shake it. I can't blame the gate entirely. Our house is old and I'm sure the doors aren't in any way square.
We thought the only option was to screw a gate into the bannister, which the Hubs did not want to happen. I, of course, being the one who mainly chased our little rascal up the stairs was all for it. I had basically given up and resorted to pushing a heavy box of diapers (we get them delivered from Amazon) up against the base of the stairs. At that point Violet had trouble moving the box, but I knew it was only a matter of time before she learned to climb over it or push it out of the way. Anyway, Munchkin contacted us at the perfect time and we decided it was worth a try.
When we first received the gate and assembled it, we thought it was completely screwed up (pun intended) as it didn't look square either, but we realized after reading the instructions that it was supposed to be that way. They purposefully manufacture it that way so that it would provide more pressure when mounted against the wall. The gate is metal, very sturdy, and was easy to install. I can lean against it and it won't budge, and that makes me very, very happy. We chose the Easy Close gate which is, like its name, easy to open and close. It's been a dream on the stairs as our other gate we have to constantly climb over, which would have been really unsafe with a clutz like me around. Violet has given it her own round of testing - the shake test, the lean test, the pull test, and the climb test. So far all attempts to compromise the integrity of the gate have failed, to our happiness and relief.
To cut straight to the point: If you're looking for a sturdy, child-proof gate that is easy to open and close I highly, highly recommend the Munchkin Easy Close Gate. Thank you so much to Munchkin Safety Gates for providing our family with peace of mind.
All opinions and words expressed in this post are my own. Although Munchkin Safety Gates provided us with a gate to review, I was not compensated in any way for this review.
So I finally tackled our bookshelf the other day during one of Violet's naps. We hang out in the back room all of the time, and every time I looked at the darn thing I wanted jump up and start rearranging things. Doesn't it feel good when you finally get to accomplish something that has been bothering you for a long time? Here's how I went about it:
First let me say that this is mainly about styling books along with a few accessories. We have a lot of books, some pretty, others not so much, but I wanted all of the books that we use to be on the bookshelf - not just the good-looking ones. So books being the focus, I started with three basic horizontal rows, simply because it's the best way to get the most books on the shelf.
I started at the bottom, as you want the most visual (and literal) weight to be there. On the VERY bottom shelf (which you can't even really see so it doesn't matter much here) I added some of the babes toys. Small items were groups in two larger containers on either side and larger items were placed in between. On the shelf above that I started the first horizontal row of just books. This is where I placed Violet's books as they are obviously easiest for her to access on one of the lower shelves.
Larger books (again, for visual/literal weight purposes) and those that were not the prettiest colors went on the next shelf up. You want most of your 'pretty' things to be at eye level, so if you want to include the uglies, keep them lower if possible. I skipped the next shelf as another horizontal row would've just been plain boring and moved on the the second from the top. On this shelf I added another horizontal row - both for balance and to maximize space, but on this row I included books that were smaller/thinner and prettier colors. When I did add larger books I kept them on the far left and far right sides of the shelf.
Finally, I tackled the remaining two shelves. I saved the VERY tall books for a vertical stack, as many of them just wouldn't fit standing straight up and down. I plopped that on the lower shelf (third down), again - the weight thing! (I feel like I'm writing a dieting post or something here - seriously!) I topped these books with a small 'pretty' object. In this case - a picture frame (although I really wanted a little ceramic bird - note to self - must purchase a little ceramic bird). On the left and right I stacked a few more large not-super-pretty books and hid them behind some much prettier items - a vase of fresh flowers and a piece of art on an easel. This broke up the books a bit but still allowed me to pack more books onto the shelf. Win - win.
And last, but certainly not least, I styled the top shelf. I took one of my prettiest books and set it in the middle facing out. This helps to balance the large vertical stack of books a couple of shelves down. In front of this I placed a glass cloche with some geometric hand-painted blocks - the vibrant colors helped to bring out the pretty colors of the books. On the left and right I did two more vertical stacks. I kept these stacks slightly more monochromatic in order to keep the focus on the center of the shelf.
After styling the last two shelves, Violet's shelf looked a little off, so I added the piggy bank in the center and it seemed to all come together.
The last thing I still want to do is to add some globes to the very top of the bookshelf. I currently have a wooden xylophone-type instrument that my father-in-law made, but I'd like a little more height and color (and I love globes!)
So there you have it! To sum things up:
Keep heavier/uglier books near the bottom (for both visual and practical purposes)
Place prettier/lighter books at eye level
Balance out horizontal rows with vertical stacks
Add a few accessories for visual interest and to break up the rows of books
Use the accessories to 'hide' uglier books and choose accessories that bring out the colors you'd like to emphasize.
Place children's books and toys on the lowest shelves for easy-access
Now I am so much happier when I happen to glance over at the bookshelf. No more rearranging urges here! Someday when I'm rich I want a library, but for now I'm content with my one little bookshelf.
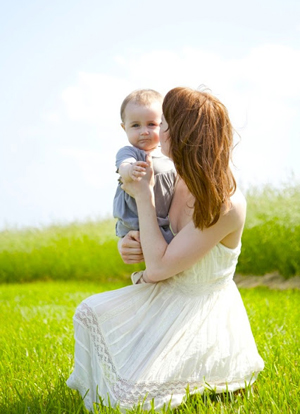
Violet loves animals. She can spot one from about ten thousand miles away. Seriously, this kid of mine has some sort of animal radar. Birds, bunnies, squirrels, cats, dogs, ants, and butterflies - she loves them all. Sometimes I think she is part pointer (is that a terrible thing to say about your child?) When she spots an animal, she goes still, all focus on the little critter at large. She lifts her chubby little pointer finger in one swift motion and screams with pure and utter delight. And when we can't get close enough to give that bunny/squirrel/bird hugs - utter devastation.
That has been our general experience with the local wildlife. That was, until we went to the duck pond.
Seriously, these animals have no fear. Bring them a bit of pizza crust and they are on you like flies on...well, you know. Violet was thrilled. I, on the other hand, was terrified that one of her wee hands was going to get bitten right off. Luckily, after I quickly flung all the pizza crust far, FAR away from us, they realized we had nothing left to offer and waddled off.
I'm happy Violet was finally able to get her heart's dearest wish (other than, of course, a room full of pacifiers and freeze-dried apples). Oh I can't wait to take her to the zoo! And for the record - we had a deal that if she fell in the Hubster was going after her. Kidding! Yes, I would even brave a duck poo-covered pond for you my little girl.
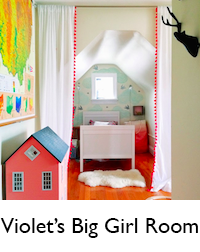
So we've made some serious headway in the playroom - hallelujah! The floors look great, the room is painted, and it looks like a whole different space. As a reminder, here is what it looked like when we moved in:
And here is what it looks like today:
I'm so happy with how much brighter and airier it's looking. Of course, the space isn't finished. The Hubster still has to add baseboard trim and I have a lot of work to do in the prettying-things-up department. Right now the room is full of hand-me-down toys, but we recently purchased a play table for the space and I'd also like to buy Violet a wooden dollhouse.
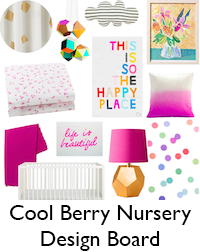
As a refresher, here is the general color scheme I am going for in the space (which will eventually become Violet's big girl room):
Most sources can be found here. I ordered samples of these three fabrics from Fabric.com:
Because her allergies can't be tested, we have to feel our way along by trial and error. We trial a food for three weeks slowly building up from a teaspoonful of food on the first day to a jar (or as much as she'll let us feed her) by the end of the trial period. If she's not allergic to a food, everything will be normal and hunky dory. If she IS allergic, she'll begin projectile vomiting for hours to the point of dehydration. She's already been hospitalized once after a reaction, so let's just say that trying new foods (and being in social situations with food) can be a little bit scary to say the least.
We weren't able to really start solids with Violet until she was ten months old, as her body needed time to heal from the reactions she had when we first tried to introduce them. Because of the delayed start and bad history, Violet had difficulty swallowing and strong aversions to tastes and textures. And although you can often coax a six-month-old into eating a spoonful of baby food, at ten months Violet was old enough to clamp that little mouth shut and run some serious interference by waving her hands in front of her mouth whenever we'd try to feed her. It's been a difficult road, but we're finally making some headway and I wanted to share with you what we've learned.
Although I doubt that many of you have the same issues that we've experienced with Violet, a lot of this can pertain to any kid who is picky with food, dislikes certain tastes, or has issues in general with eating solids, so I hope some of you find it helpful! Here's what has worked for us:
Tips for Little Eaters:
1. Start with something bland. Violet's prescription formula is very VERY bland, and we made the mistake of trying to start solids with apples. Let's just say it was a LOT more flavor that she was used to and it didn't go well. We went back to the drawing board and tried potatoes instead. Although she still wasn't thrilled, it went much more smoothly than apples. We then slowly built up to carrots, apples, and so on up the taste ladder.
(Violet is currently eating plums, broccoli*, carrots, blueberries**, potatoes, avocado, prunes, and freeze-dried apples. Why no meat, grains, or dairy? No, we're not vegans. FPIES kids react least often to fruits and veggies, although we may be trying a meat next.)
*Okay so she just bites it and then spits it out, but it's progress! **She eats the insides and spits out the skin. I'll take it.
2. Stick with what works. Once you've found a food that gets good reviews (Violet eventually decided she really loved freeze-dried apples and pureed carrots) stick with that for a little while in order to build basic eating skills (chewing, swallowing, and the like) That way they're not focusing on the taste or texture as much and are really able to just get the basics down.
3. Patience is key. For a long time Violet would put freeze-dried apples in her mouth, but didn't seem to realize that she was supposed to swallow them. We'd always find little apple bits all over the place, which was frustrating, but we knew we were making progress based on the fact that she wanted to put them in her mouth at all. After a LOT of patience, one day it eventually clicked and she realized that those apples were FOOD and that she was supposed to eat it. That was such a huge milestone - it was the first truly solid thing that she swallowed and that opened up whole new doors for us.
4. Discover your inner model No matter how much you DON'T want to eat prunes or broccoli or freeze-dried apples (which are actually surprisingly good), this one is really important. If you won't eat it, most likely neither will they. Over exaggerate chewing and swallowing so that your child can observe eating skills and hopefully imitate them.
5. Use peer pressure to your advantage One of our huge breakthroughs came on a day when we went to visit Violet's babysitter and her kids They were gobbling down Violet's freeze-dried apples like they were candy, and Violet realized that not only were those things a hot commodity, but also that the other kids WEREN'T SPITTING THEM OUT. It was after that day that we really noticed that she started to chew and swallow. I also will play YouTube videos of other babies and toddlers eating. She really watches and imitates what she sees in the video. This is how we got her to start taking bites of larger bits of food and she also tries to use utensils now as well. Seriously, what did parents do before the internet?! Here are her current favorite videos:
We alsorecently started to take Violet to feeding therapy. We would have started sooner, but it took THREE MONTHS to get in! Here are a few tips that the therapists shared with us:
Provide your child with at least two preferred and one non-preferred food at each meal
Limit distractions
Eat as a family at the table and serve family style at all meals
Allow your child to help with food preparation and setting of the table (Violet seems to eat more when she sees me chopping up her food for whatever reason)
Set mealtime routine with breakfast, snack, lunch, snack, dinner
Allow child to 'play' with food and get messy. (This one surprised me as parents are notorious for telling children NOT to play with their food, but apparently studies have shown that children who are allowed to play with their food become better eaters in the long run. Playing with foods has allowed Violet to get used to new textures and to learn that eating is fun and not just a chore. It's definitely a LOT more work, but it's working and that's what matters.)
Do not hide foods in other foods, 'trick' you child into eating a food, or force feed your child. (The idea is to gain your child's trust. Mostly I place the foods in front of Violet and allow her to decide what she wants to eat and doesn't want to eat. I model and encourage certain things, but don't force the issue. Usually she will eventually try everything on her tray.)
Don't strap your child into the high chair. (Obviously if you have a very squirmy child and feel that it's a safety issue, by all means use the straps, but this kind of goes along with the trust thing and making eating fun and not a chore.)
And although this post has gotten (quite) long already, I have one more thing I really want to add. The next time you see a mom feeding her child formula, please don't judge. I nursed Violet for nine months and would probably have gone longer if it hadn't been for her GI issues. After months of her reacting to my breast milk and an elimination diet that caused me to lose too much weight, we finally ended up with a prescription formula that has done wonders for my baby girl. She's like a totally different, much happier and healthier girl now that she is on something that doesn't irritate her little body. She sleeps better, feels better, and I can't thank formula companies enough for making these products for kids who need them. You never know for what reasons a mom is scooping powder and shaking up bottles, but know that they are most likely good reasons and that she is doing what is best for her and her family.
Thanks for letting me get up on my soapbox for a minute there. I really, truly hope that this post is helpful to some of you - whether your child is just a picky eater or something more serious.
And if you have any tips for getting your kids to eat solids, I'd love to hear them!
We are supposed to bring 40 business cards to share at the workshop I'm attending with Joy Cho of Oh Joy! on the first of August. Problem is - I don't have any. Eek! Luckily, I'm blessed with a sister who is also a graphic designer, and she whipped one up just for me:
We ordered them here. I'm sooo excited, I can't wait to get them in the mail! Thank you dear sister!
I am so ridiculously excited for the day when Violet starts to create some artwork of her own. I absolutely love children's art and think it is important to display it in a beautiful way your home. Not only does it show your children that their creations are valuable to you, it is also very beautiful and can really add life to any space. (Case in point):
Here are a few of my favorite ways in which to display your little one's masterpieces:


