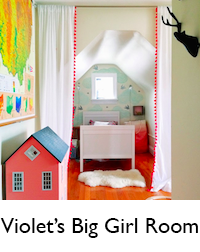
I'm so excited that the 'construction' aspects of the nursery are complete! Hardwood floors, beadboard, and trim have all been installed, and everything has been covered in a fresh coat of paint:
The only thing we did not get to finish is the window seat - it needs a new top. The hubster will be working on that this weekend, and we will be assembling and installing the furniture and curtains. Stay tuned and have a wonderful weekend!
Pages
I'm Loving...
This beautiful painted frame and the artwork inside of it:
Okay, so I know it's no longer the holiday season, but really you could use this idea any time of year - just change out the words! For Valentine's Day you could use words like love, kisses, hugs (think edible hearts). For everyday, home, family, cozy, nest. You get the idea. The nativity is pretty as well. The best part is that this would be so easy to DIY!
Or if you don't feel up to the task of making one yourself, I also recently came across these very similar frames at Pottery Barn.
Found here
Okay, so I know it's no longer the holiday season, but really you could use this idea any time of year - just change out the words! For Valentine's Day you could use words like love, kisses, hugs (think edible hearts). For everyday, home, family, cozy, nest. You get the idea. The nativity is pretty as well. The best part is that this would be so easy to DIY!
Or if you don't feel up to the task of making one yourself, I also recently came across these very similar frames at Pottery Barn.
Thinking ahead...
Sometimes when I'm reading my favorite blogs and come across a beautiful image, it gives me an idea for my own home. Lately, I've been seeing a lot of images with stenciling and I think it would be perfect for our guest room.
Now this room is not very high on the priority list right now, but this would be an inexpensive project that would really add a lot of character to the otherwise neglected room. Currently I can't even get into the room let alone stencil it, as all of the nursery furniture is currently housed there, but it doesn't hurt to gather ideas! Here are some of the images that have inspired me:
Now this room is not very high on the priority list right now, but this would be an inexpensive project that would really add a lot of character to the otherwise neglected room. Currently I can't even get into the room let alone stencil it, as all of the nursery furniture is currently housed there, but it doesn't hurt to gather ideas! Here are some of the images that have inspired me:
Found here
Found here
Found here
Found here
Pregnancy Update
How far along? 25 weeks 6 days
Total weight gain/loss: 24 pounds
Stretch marks? Nope.
Sleep: It's still just okay - Still mostly woken by cats, not baby, although it is getting harder to get comfortable.
Best moment this week: Every moment that I'm eating a muffin...
Movement: Feels like a giant Mexican jumping bean inside of me!
Food cravings: MUFFINS! Do you know the muffin man? I wish I did!
Gender: Still a girl!
Labor Signs: None (thank goodness!)
Belly Button in or out? It has emerged...
What I miss: Sleeping on my stomach, bending over and standing up easily, hot baths, wine, clothes that fit...
What I am looking forward to: Finishing the nursery construction so that we can move in the furniture and decorate!
Weekly Wisdom: My husband is amazing. Thank you honey for cheering me up when I cry, being squished in the bed so that I can be comfortable with all of my pillows, and for working so hard on the nursery when you already work so hard outside of our home. XOXO Love you!!!
Milestones: 2nd Trimester is almost over!
How to Install Beadboard
After posting my idea board for Violet's nursery on the Nest, a few Nesties requested that I do a tutorial on installing beadboard paneling. Now really, this is more the Hubster's area than mine - I'm more of his 'lovely assistant' when it comes to this sort of thing. Sure, he'll let me squeeze out some liquid nails or shoot a nail gun from time to time, but he's definitely the one with all of the know-how. So blog readers, you're in for a treat - a rare guest appearance by none other than...the Hubster:
Just so you know, as I write this there is a gun being pointed at my head with a fickle finger on the trigger. Don't get me wrong, I want to help, but I am as distracted as she is fickle.
(Okay, Lauren interjecting here - this guest post was his idea I swear! Secrets about the Hubster revealed: not only is he easily distracted...he is also a HUGE procrastinator. So yes, he may be blogging at gunpoint, but only to get him to do the work that he graciously volunteered to do *wink wink* Love you honey!)
Let's start with the tools you will need to get the job done the right way.
Tools needed:
1. Pencil
2. Nail Set
3. Carpenter's Square
4. Finish Nails
5. Chalk Line
6. Sabre Saw or Keyhole Saw
7. Nail Gun or Hammer
8. Liquid Nails - Wood or Paneling will work (get a bunch of these)
9. Tape Measure
10. Sawhorses
A table saw is also very helpful if you have one, and obviously, you will need the beadboard itself. We purchased Georgia-Pacific MDF paneling at the Home Depot. We bought the panels pre-cut which was a huge time-saver. They are about 30-32 inches tall and four feet long.
Now that you have your tools, let's get started.
Assuming the baseboard trim has been removed, the first thing you need to do is lay out guidelines on the walls for the top of the paneling. To do this, measure from the floor up the wall. Your measurement should be the height of your paneling plus an extra quarter inch. Make a mark. Do this at each corner of the room. Next, strike a chalk line between the measured marks on the walls.
How to strike a chalk line:
If your house has an uneven floor like ours (older houses tend to have this problem), you will need to move along the line and recheck the measurement while looking for the highest point of the floor. If you find a difference, adjust your marks on the walls and strike a new line. You will use this new line to line up the top of your panels.
Now we can begin installation. Use the chalk line to guide the panels along the wall, keeping them straight and parallel. In the corners, you may need to scribe an angle if the walls are not perfectly square. (If it's only a small difference it can be hidden by trim in the corners.) Also, allow for a small space in between the panels of about 1/16-1/8 of an inch for expansion.
How to scribe an angle:
I used a sabre saw (jig saw) to cut out holes for outlets and to cut around windows. When fitting the paneling around window, it is preferable to remove the window casing if possible. It can be put back in place later to hide the edges. You can also use a sabre saw to cut panels to length at the end of a wall especially if they are not square.
To attach the panels, first use liquid nails. This is very easy, just cut the tip of the tube and puncture the inner membrane. Then squeeze out the liquid nails onto the beadboard and apply to the wall. Apply pressure on the panel to encourage the adhesive to stick.
Next, use a pneumatic nail gun (or you can use small finish nails with a hammer) to nail the edges of the panel to the wall. The nails at the top and bottom will later be hidden by trim. The nail holes on the sides can be filled with paintable caulk.
Repeat until the room is wrapped in a fresh coat of primed beadboard paneling. Lastly, install new baseboard trim and cap your bead board with chair rail moulding. Trim may also be needed for inside and outside corners. Then all that's left to do is paint and add trim - we used Behr's Ultra Pure White Semi-Gloss, but do whatever floats your boat. That's it - I'm all blogged out!
Thanks hubby for helping out with this post! I know the basics from watching him install it, but would not have been able to explain everything so well.
XOXO,
Stolen from Smonk You...
Before we found out if we were having a boy or a girl, a lot of people would guess according to old wives' tales. I found a great list of these on smonk you and thought I'd see if the old wives knew what they were talking about:
Short time to conceive = Girl
The baby's heartbeat was clocked at over 140 = Girl
According to the Chinese gender chart = Boy
I sleep on my left and right side = Boy or Girl
I feel nausea = Girl
I'm craving citrus = Girl
I am gaining weight = Girl
I'm breaking out a bit = Girl
I'm feeling clumsy (well, I've always felt clumsy) = Girl
Weight gain in my face = Girl
I'm craving salty stuff (I always crave salty stuff) = Boy
I'm moody = Girl
I'm carrying low = Boy
My hair has become thinner and dull = Girl
Grand total:
Girl = 10
Boy = 3
Indeterminate = 1
And of course, I'm having a girl! The funny thing is, when Kenny did this on his blog, he got 7 for a girl and 7 for a boy - 50/50. Even funnier, his baby's legs were crossed during the ultrasound, so him and his wife have no idea what they are having!
So maybe there is something to all of this old-wivery and tale-telling. I'd love to hear if this test worked for anyone else!
Nursery Progress
I thought I'd share a few photos today of the progress we've made on Violet's nursery. The 'construction' parts of the projects are almost complete. I can't wait to move in the furniture and get to the decorating!
Here's a recap:
First we painted (well not so much me - I pretty much helped pick a color and then watched)
(Isn't the Hubster cute with his paint hat?!) We chose Behr Prelude for the paint color.
Next we (mostly the Hubster again - I'm more of his assistant for this kind of stuff) installed our hardwood flooring from Lumber Liquidators:
We got it on close out for $1.49 per square foot! You can find some really great deals there. We purchased enough for all three bedrooms. We also bought our downstairs Brazilian walnut from LL.
Finally, we (again - minimal help from me) installed the beadboard:
Stay tuned tomorrow for instructions on how to install beadboard panelling - and a special guest post from the Hubster!
Next phase: move in the furniture and decorate. Stay tuned!
I'm Loving...
Freshly sharpened colored pencils! Okay, so as an art teacher, I must say that I am seriously in love with this:
Oh the possibilities!
Found here
I now must make one. Maybe I'll do my entire name...or Mrs. H...in colored pencils, crayons, markers, etc. and hang it in my classroom! Or maybe make a little art nook for Violet and have the word 'Art' or 'Create' hanging above it...Oh the possibilities!
Little Green Notebook Inspiration
One of my favorite blogs to read is Jenny Komenda's Little Green Notebook. I am especially obsessed with her dining room, among other things! So when I found this chair from Pier1 Imports, it immediately made me think of her (much more fabulous) settee. She upholstered it herself with Chiang Mai Dragon fabric from Schumacher:
The idea grew from there and before I knew it I was creating an idea board for my new sitting room inspired by her amazing dining space. It is not nearly as creative and beautiful as her space is, but here's what I came up with:
For a more sophisticated look like Jenny's, I'd probably find some more traditional looking side tables and frames and paint them with the brighter colors. I'm loving the oversized tan chair...it would be great for blogging!
As much fun as Jenny's room is, this idea board would probably more likely to happen if I had my way:
If only I could afford the chair AND the fainting sofa! A girl can dream, right?
LGN Idea Board:
Tan Chair - Macy's
Bookcase - cb2
Peacock Blue Curtain - Urban Outfitters
Sunburst Mirror - Neiman Marcus
Peacock Blue Lamp - TableLamps.com
Green Side Table - cb2
Green & Orange Frames - cb2
Rug - Pottery Barn
Light Blue Cuckoo Clock - amode
Topiary - Ballard Designs
Ink Blue Ottoman - Room & Board
Accent Chair - Pier1 Imports
Idea Board 2:
Tan Chair - Macy's
Bookcase - IKEA
Sunburst Mirror - Neiman Marcus
Round Coffee Table - JCPenney
Fainting Sofa - Urban Outfitters
Waterfall Ruffle Curtain - Urban Outfitters
Wallflowers - LaDIFFERENCE
Rug - Anthropologie
Floor Lamp - cb2








 F
F


